ArcGIS Pro course - basic
 Learn ArcGIS Pro Easy - is a course designed for GIS enthusiasts who want to learn how to use this Esri software, or users of previous versions who hope to update their knowledge in a practical way. ArcGIS Pro is the new version of the most popular commercial GIS software, ending with ArcMap 10x.
The course is designed by Golgi Alvarez, based on its AulaGEO methodology:
- All in the same territorial environment,
- Tasks done by an expert, explained out loud,
- Take the course at your own pace, with access for life,
- Option to ask questions when you want,
- Materials and data available for download,
- Access from mobile devices,
- In Spanish and English.
The course consists of six sections; In the first five, we work with data at the country level, learning step by step how to do routines on the same data. In section 6 we work on a second model, and exercises are carried out on properties gradually, from importing data from AutoCAD / Excel to making complex expressions and theming based on external linked tables.
Access the Spanish Course
Access the Course in English
Below is a summary of the course content.
1 section. Basics of ArcGIS Pro
 Let's start with ArcGIS Pro. In this class, the new interface of the program is introduced, with the content management in the left panel and the data catalog in the right panel. It is done by following an exercise using data from airports worldwide, consulting data about them and trying to become familiar with the upper ribbon and tools.
Data Selection In this class you learn the different ways of selecting objects, both by selection on the keyboard and based on tabular and spatial attributes. From now on, all work is carried out on a single territory at the country level.
 Zone Marking (Bookmarks). Here it is defined as establishing quick selection zones, to be able to navigate in a practical way. This exercise is performed using the satellite imagery service (world imagery) and it is taught how to create, scroll, zoom, edit or delete the area of interest (bookmark).
Section 2. Creating and editing spatial data.
Add data from Excel. This includes step-by-step, how to insert spatial data from an Excel coordinate table. Geographical coordinates are used in this case; in a later exercise you will always insert Excel UTM coordinates. Of course, in this and the other exercises the files are included to be able to replicate the class.
 Data Symbology This class includes applying thematic symbology based on table criteria. The regions at the country level are used for this, which is the same throughout this exercise (Madagascar).
Editing attribute data. Here on the same territory selected aspects such as editing alphanumeric data, modifying and adding columns, as well as area calculation and storage in tables based on a projection system are explained.
Labeling of attributes. Now, it is explained how to bring the tabular data of an object and make them visible as attributes (labels). It is explained how to do it for polygons, lines and points; as well as aspects related to the orientation of the label.

Digitization of geographic information. Tools for editing spatial data are explained.
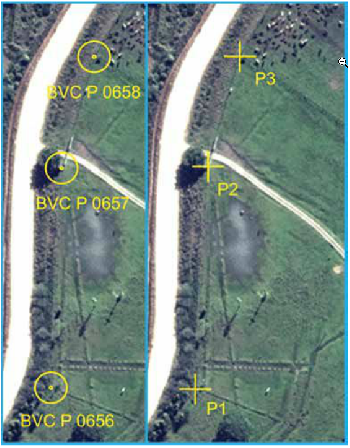
Georeferencing images. Here, using known points on an image, georeferencing is done based on the spatial layer.
3 section. Analysis of data
Influence analysis - Buffer. It is explained how to select a spatial data and on this apply geoprocessing of influence area, choose the type of alignment, type of end.

4 section. Publish content with ArcGIS Pro
Generation of Maps. Here we explain how to build a box for printing, explaining how to add elements to the map such as graphic scale, thematic symbology, north symbol, etc. It also explains how to export the map to other formats (pdf, png, jpg, eps, etc.) for printing or viewing with commonly used programs.
6 section. Let's do it - step by step exercises

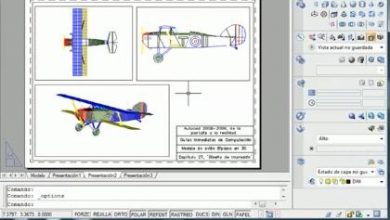
In this section, on a second smaller work area, exercises applied to common tasks on property issues are carried out. They remember the area that we turn into a digital model from images, using Regard3D, AutoDesk Recap and whose point cloud we send to Civil3D. Well, the following exercises are performed on this same area using ArcGIS Pro, with more explanatory videos. Input data, files needed to do the exercise, and output results for checking are included for all exercises.
 Implications of the change from ArcMap to ArcGIS Pro. In this class, a tour of ArcGIS Pro, its interface, is made, explaining the main changes, advantages, and implications of this version compared to ArcMap. Each section of the upper headband is explained, where are the main functionalities and their potential under the redesign that ArcGIS Pro had.
E1 jercicio. Import properties from an AutoCAD map to GIS. Take a dwg file from AutoCAD / Microstation, and try to import from ArcGIS Pro; explaining what to do when the version is not supported. Aspects such as the separation of objects by layer are explained, eliminating unnecessary objects such as the axis of that street that is too much, the conversion to feature classes and conversion of objects that should be polygons but that came as lines as is the case of the polygons of the building, the grouping of lines that should be one in the case of the main axis of the river, the houses and the lagoon. Above all, how these CAD objects become GIS layers.
 Exercise 2. Dismantling a site from GPS points in UTM format. On the work imported from AutoCAD, a set of coordinates obtained with GPS that are in UTM format is brought to perform a property dismemberment. The exercise includes the tasks of importing the projected coordinates in XY form, assigning them WGS84 projection, zone and then transforming them into vertices on the map. On these, the option to create sub-plot, snap control to digitize the dismemberment, calculate the perimeter and area both in square meters as well as the conversion and storage in another column such as hectares is applied.
Exercise 3. Composition of complex calculated fields. This exercise is unique. It treats, continuing with the property development, it is explained how to make more complex linkages, such as a cadastral key based on the centroid in the form P-coordinateX, coordinateY, a dash and then a number.
 Exercise 4. Buffer Analysis. On the river that crosses the properties, the calculation of the zone of influence is carried out, using a buffer of 15 meters from the axis in the main river and 7.5 meters in the tributaries. Additionally, it is shown how to do the dissolution to have a single polygon of the area of influence.
Exercise 5. Labeling of attributes. Now, as a continuation of the work with the properties, it is explained how to create expressions to chain various data from different columns of the table in the form of labels. In this case, the cadastral key that we previously formed, and the area adding the A = before the value. Additionally, it explains how to rotate the label, in the case of river axis names, and also how to apply special effects and customize the style of the text.
 Exercise 6. Thematization by attributes. This part of the course teaches how, based on the tabular data, the properties can be thematized, using the criteria and functionalities of ArcGIS Pro. An Excel table is linked where the owners of the properties are, and a search is made for the properties that they have a special condition, for example where the owner has the name "Juan", where there is no identity card and then it is thematized based on criteria.
Exercise 7. Digitization tricks This class is focused on the aspects of creating and editing spatial data. Digitization tricks are explained such as making a hole in a property from the lagoon, how to fill the channel polygon using auto-completion or how to draw along the river using the trace tool.
 Exercise 8. Georeferencing images. Here, having an image from which UTM coordinates are known, georeferencing is done. Unlike the exercise in the previous section, the tuning is done based on these coordinates drawn as vertex X, Y. There may be other ArcGIS Pro courses. Perhaps none like this.
Once you acquire the Course, you can access it for life and take it at your own pace as many times as you want.
In Spanish

In English