How to handle elevated routes in Google Earth
A few days ago someone asked how to manage points or routes with elevation in Google Earth ... and we could not ... reading the blog OgleEarth I have found a way to do it.
The truth is that when you put the data on GoogleEarth you have no way to edit the elevation, because the options that the system gives is that the points are seen "so many meters" on the 3D terrain, but they are still in two dimensions. Other apps that Show profile And contours do not give the data easy to save.
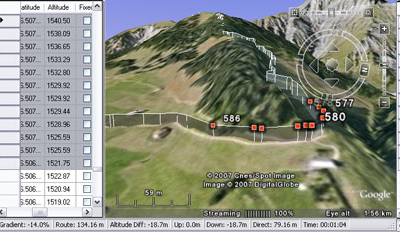
The application we will talk about is 3D Route Builder, developed in compatibility with Google Earth allows you to create, import and export routes, edit data, view them as a profile, travel the route ... and much more.

1. The origin of the data
- 3D Route Builder receives data that is in the parameters of Google Earth, that is, in geographic coordinates (latitude-longitude), wgs84.
- 3D Route Builder supports data in the formats: Google Earth kml / kmz, GPX, Garmin TCX and xml. To generate them from a data set in excel you can use EPoint2GE o KToolboxML.
- In case of having the data taken with the GPS, just make sure to export them to GPX or TCX format so that you can keep the name and description that a kml can complicate you.
2. What you can do with the data in 3D Route Builder
- Edit the data in tabular form, where you can edit either the description, coordinates, elevation, take time, add or delete.
- Navigate the route in helicopter flight, choosing the speed and angle of view.
- Export the data, you can send them to formats like: kml / kmz, GPX that is compatible with many devices, CRS that is used in the courses of remote sensors, CSV to be able to visualize it with Excel, XML and SAL for some applications used by cyclists .
- If you then want to send them to ArcGIS compatible formats, AutoCAD or Microstation reviews the post when We talked Of it.
3. From the most succulent of 3D Route Builder
- You can display a Google Earth window embedded in the application, with the compass controls.
- You can define symbologies for the points
- You can choose points with checkpoint and make massive operations like increase or decrease of elevation, soften profile, eliminate redundant points, interpolate, change the order of points and others.
- Show a profile view that has zoom features
- Use almost all features with the free app, if you do not offend a couple of AdSense ads; To save data while keeping the originals, the version plus (20 Euros) is required.

The application has a complete help and with little content but worse is nothing too a forum.


is very good
And what brand or model do you have?
I want to learn how to use technical mind my GPSpus I handle it impirically