
How to download images from Google Earth - Google Maps - Bing - ArcGIS Imagery and other sources
For many of the analysts, who want to build maps where a raster reference from any platform such as Google, Bing or ArcGIS Imagery is displayed, we are sure that we have no problem since almost any platform has access to these services. But if what we want is to download those images in good resolution, then what solutions like StitchMaps disappear, definitely the best solution is SAS Planet.
SAS Planet, is a free program, of Russian origin, that allows you to locate, select and download multiple images from different platforms or servers. Inside the servers, Google Earth, Google Maps, Yahoo, Bing, Nokia, Yandex, Navitel Maps, VirtualEarth, Gurtam can be found and overlays can be added to the image, such as labels or road structures - what is called hybrid- . Among its news, you can list:
- be a completely portable application, does not require installation of any kind, just by executing it it is possible to carry out any process,
- the possibility of entering .KML files,
- measurement of distances and routes
- load of complementary data from other servers like Wikimapia,
- Export of maps to mobiles, compatible with platforms such as Apple - iPhone.
By means of a practical example, the steps to extract information in raster format from any of the aforementioned platforms can be viewed. One of its greatest advantages is that the images downloaded through this application are georeferenced, which saves time in the construction of products. Different from what happens with Google Earth images, they can be saved - downloaded, but require subsequent georeferencing processes, which translate into time consuming.
Sequence of steps to download images
Raster selection of the area of interest
- The first step is to download the file that contains the SAS Planet installer, in this case the latest version released for public use in December 2018 was used. The file is downloaded in .zip format, and in order to run, they must unzip the content completely. Upon completion, the destination path opens and the Sasplanet executable is located.
- When executing the program, the main view of the application opens. There are several toolbars (green color), and the main menu of the application (red color), the main view (orange color), the zoom of the view (yellow color), the relative situation (violet color), bar of state and coordinates (fuchsia color).

- To start the search, if you know what the required area is, you approach the map of the main view, until you reach the desired place, in one of the toolbars you choose the raster information source, in this case it is from Google .

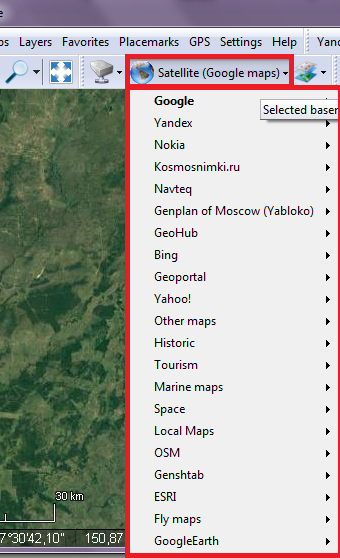 If you want to change the source of the information, just click where the name of the database is indicated, there you can choose between: Google, Yandex, Nokia, Kosmsnimki, Navteq, Genplan of Moscow, GeoHub, Bing, Geoportal, Yahoo! , other maps, historic, tourism, marine maps, Space, local maps, OSM, ESRI, or Google Earth.
- After the election, the selection of the required area is made. Depending on how the raster is viewed, the server is chosen, for the example the Google image was used, since it did not contain any kind of cloud present in the scene.

- Then, the button is activated Shift, with this the study area will be selected by means of the cursor. Simply click on a corner and drag to the desired location, a final click is made, and a window opens, where we must place the output parameters of the selected image.
- In the window, several tabs are observed, in the first of them Download, the zoom level is chosen. Zoom levels range from 1 to 24 - the highest resolution. When the image is selected, in the zoom bar, the level is indicated, however, in this window it can be changed. It also indicates the server from which the product will be extracted.

- In the following tab, the output parameters are placed. Specifically for the raster to be saved with the spatial reference information. In the box (1), the format of the image is indicated, in the box (2) the output path, in the box (3) the server selected, in the box (4) if there is any layer of overlap, in the box (5) the projection is specified, then a group called Create georeferencing file (6), the most convenient option is marked, in this case the .w, the quality is still left by default at 95%, and finally click on start,

- The image has been exported in JPG format, but it can be exported in the following formats: PNG, BMP, ECW (Enhancement Compression Wavelet), JPEG2000, KMZ for Garming (Jpeg overlays), RAW (single bitmap graphic), GeoTIFF.
 If you check the folder where the image has been saved, 4 files can be identified, the raster .jpg file, the auxiliary file, then the jpgw is observed (this is the reference file created previously .w), and the .prj associated with the image.
Raster display in the SIG
 After having the process, the file is opened in any GIS software to be able to verify that the image is exactly in the required area. To continue, in an ArcGIS Pro project, layers are loaded in shape format, indicating the place where the newly exported image should be placed.
- When you open it, you can see that the image fits completely, with the elements in shape format of the main view, that is, with the bodies of water in vector format. The reservoir present in the image adjusts to the location of the polygon, therefore, it is considered to be perfectly referenced

Use of the hybrid
 If you want to extract raster data with other content, such as streets and avenues, and use them in mobile devices for the user's location, the same process of selection of the area of interest is carried out.
The difference is that now the Bing server data will be taken, in its version roads - streets, the main view indicates only the most relevant sites of interest, as well as the names of the main streets. If you continue to approach the main view, details related to the study area are loaded.
Now, if the previous raster is required to have the data of the route maps and sites of interest loaded, only the hybrid - hybrid, which is simply superimposing the data from a base of reference places, with the raster image.
- In the tool panel, there is the button that are superimposed layers, when entering there, all the cartographic bases that can be superimposed with the raster are displayed. From Google, OSM - Open Street Maps, Yandex, Rosreestr, Hybrid Yahoo, Hibrid Wikimapia, Navteq.
- Then, for the raster base, the Bing Maps - Satellite server is used, then it is entered in the menu hybrid, and activate as many as needed, - this to determine, which of the hybrid has more spatial information, for the example were chosen: Google, OSM, Wikimapia, and ArcGIS hybrid, the view of the raster with the superimposed layers is shown below.

 To save the image, with the data of hybrid, the view is selected as in the previous cases, but this time, when the screen of the parameters of the image is displayed, the following is selected: in the tab stitch, the output format, the output path, the raster base (Bing) are placed, and the Overlay layer - the Google Hybrid was chosen - and the spatial reference file .w.

- After the process is run, the image is opened in the SIG or software of your preference, and it is verified that the image with the superimposed data of Google Hybrid was actually exported. The labels of the elements present in the area of interest are displayed, and when the shape is placed, it is located exactly where the body of water should go.
The process of this article can be seen in the Youtube channel of Geofumadas
Closing remarks

As it could be verified, the use of the tool is quite simple, it does not require major efforts to understand the dynamics of each of the processes and tools that compose it. Therefore, its use is highly recommended.
Unlike other initiatives in this function of downloading georeferenced images, such as the case of Stitchmap, the evolution that SASPlanet has had is redeemable, which has consistently added tools and functionalities in each of its updates, as well as access to more and more services. This article has been made using the latest stable version, from December 21, 2018, however, we offer you this link, from the official page, which contains a repository of all the versions that have been released since 2009.
Congratulations for SASPlanet and its 10 years of continuity.


very good manual. Anyone who wants to learn to edit images we recommend you visit our course photoshop madrid
for everyone who is in the city.